With all the gadgets in your house it can be hard to know what’s bleeping at times. In this guide, we’re going to help by explaining how to read your smart electric meter.
We’ll go through everything from knowing what sort of smart electric meter you have, to understanding how you can read them.
What is an electric smart meter?
Electric smart meters are used to measure how much electricity you’re using. In most cases smart meters can send this information through a remote connection to your energy supplier.
It’s thought that every home and office in England, Scotland and Wales will be offered a smart meter by the middle of 2025, that’s around 50 million gas and electricity meters for 27 million UK households.
The idea is that having a smart meter will help lower the amount of energy you use by providing a real-time account of how much electricity you’re using – meaning no more estimated bills.
When you have a smart meter installed into your home, you normally also get a small portable device with a screen known as a “smart energy monitor” or “in-home display”.
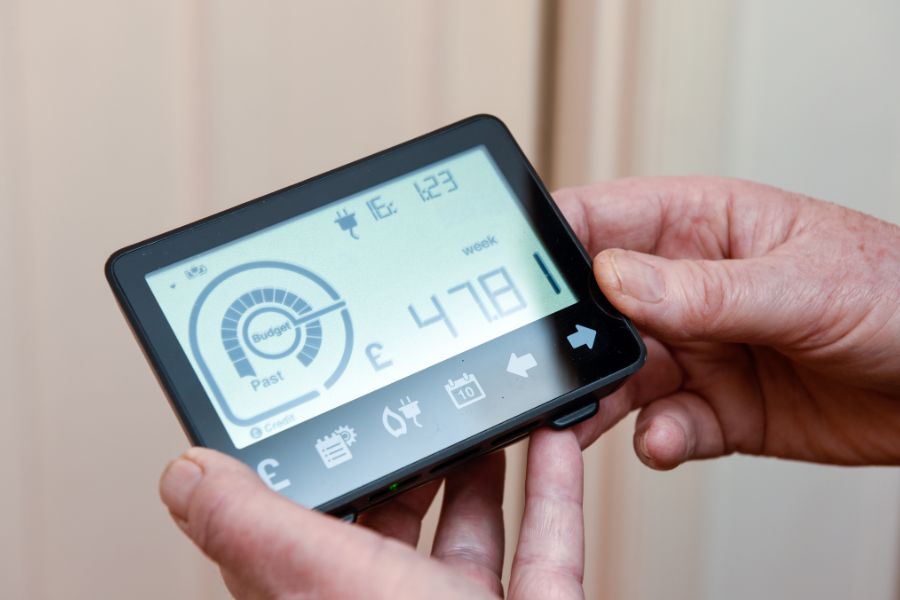
You’re best not to get these confused as they can offer you different information. Smart electricity meters provide you with the overall energy usage of your property, which is what is collected by your energy provider. Whereas smart energy monitors give you broken down information on the use of individual appliances.
So, when you’re required to read your smart electric meter, make sure you’re looking at the right device.
Why do I need to read my smart electric meter?
If your smart meter is in what’s known as “smart mode” your meter will automatically send the data to your supplier. Check that your smart meter is working in smart mode here.
However, there may be some situations where you need to read your electric smart meter yourself, for example:
- If you’ve recently switched energy supplier – as you’d normally need to send the first meter reading yourself.
- If you’ve switched supplier and they’re unable to connect to your meter. This can sometimes be the case if you’ve got an old smart meter.
- If you want to check your meter reading, to see how much energy you’re using.
Many energy suppliers will allow you to submit your reading via an app or on their website, or you can give them a call.
If you‘re unable to get to or read your smart meter, many suppliers offer extra help if you need to read or move your meter to a more convenient place.
How to read a smart electric meter
There’s various different types and models when it comes to smart meters. Usually your smart meter will fit into two different categories:
- First generation (SMETS1) smart meters
- Second generation (SMETS2) smart meters
The way to read your may also depend on if you pay:
- A single rate at all times
- 2 rates – one rate during the day and a cheaper rate at night
Most people pay a single rate at all times. If you have an ‘Economy 7’ meter, you pay 2 rates. If you’re not sure, check your bill to see if you pay 2 rates.
First generation (SMETS1) smart meters
If your meter has a keypad
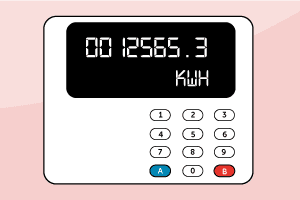
If you pay a single rate at all times
- Press 9
- Wait until you see the letters ‘IMP KWH’
- You’ll then see numbers followed by ‘KWH’ – this is your reading
- Write down the numbers from left to right
- Ignore any zeroes at the beginning and any numbers after the decimal point
If you pay 2 rates
- Press 6
- Wait until you see ‘IMP R01’ followed by numbers – this is usually your night or ‘off-peak’ reading
- Press 6 again until you see ‘IMP R02’ followed by numbers – this is usually your day or ‘peak’ reading
- Write down the numbers from left to right
- Ignore any zeroes at the beginning and any numbers after the decimal point
If you’re not sure which is the day rate or the night rate, check the numbers in the morning and check again later that day. The number that’s changed will be your day or ‘peak’ rate.
If your meter has A and B buttons
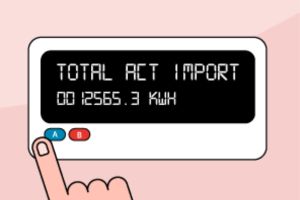
- Press the A button
- Press the A button again until you see ‘TOTAL ACT IMPORT’ and numbers followed by ‘KWH’
- Write down the number from left to right
- Ignore any zeroes at the beginning and any numbers after the decimal point
If your meter has a green A and a white B button
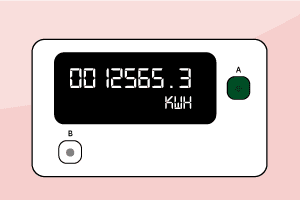
If you pay a single rate at all times
- Press the white B button – the screen will light up
- Wait until the screen says ‘meter boost’ – press ‘A’ to select ‘no’ and you should see numbers followed by ‘KWH’
- Write down the numbers from left to right
- Ignore any zeroes at the beginning and any numbers after the decimal point
If you pay 2 rates
- Press the green A button
- Press the green A button again until you see ‘Rate 01 Act Imp’ – this is usually your night or ‘off-peak’ reading
- Press the green button again until you see ‘Rate 02 Act Imp’ – this is usually your day or ‘peak’ reading
- Write down the numbers from left to right
- Ignore any zeroes at the beginning and any numbers after the decimal point
If you’re not sure which is the day rate or the night rate, check the numbers in the morning and check again later that day. The number that’s changed will be your day or ‘peak’ rate.
If your meter has three unmarked buttons
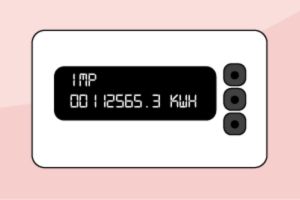
If you pay a single rate at all times
- Press the middle button
- Write down the number below ‘IMP’ from left to right
- Ignore any zeroes at the beginning and any numbers after the decimal point
If you pay 2 rates
- Press the middle button – it should say ‘R1’
- Write down the number below ‘IMP’ from left to right – this is usually your night or ‘off-peak’ reading
- Press the middle button again – it should say ‘R2’
- Write down the number below ‘IMP’ from left to right – this is usually your day or ‘peak’ reading
- Press the middle button again – it should say ‘T’
- Write down the number below ‘IMP’ from left to right – this is your ‘total’ reading
- Ignore any zeroes at the beginning of numbers and any numbers after the decimal point. You’ll only need the ‘total’ reading if your supplier asks for it
If you’re not sure which is the day rate or the night rate, check the numbers in the morning and check again later that day. The number that’s changed will be your day or ‘peak’ rate.
Second generation (SMETS2) smart meters
If you have 1 orange button and 2 blue buttons

- These meters have a row of numbers followed by KWH.
- Press the orange button to the left of the screen
- Write down the numbers from left to right
- Ignore any zeroes at the beginning and any numbers after the decimal point if there is one
If you have a meter with two white buttons to the right of the screen
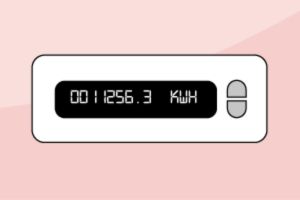
- Your meter should have ‘Kaifa MA 120’ printed on it. It will automatically change between four different screens, so you don’t need to press anything.
- Wait for the screen that shows numbers followed by KWH
- Write down the numbers from left to right
- Ignore any zeroes at the beginning and any numbers after the decimal point if there is one
If your meter has 2 buttons to the right of the screen and one says ‘reconnect’

- Your meter will have one button which says ‘reconnect’ and another button which says ‘display’ or ‘display select’
- Press the ‘display’ or ‘display select’ button
- Press the ‘display’ or ‘display select’ button again until you see numbers followed by KWH
- Write down the number from left to right
- Ignore any zeroes at the beginning and any numbers after a decimal point if you have one
If your meter has a green A button and grey B button to the right of the screen
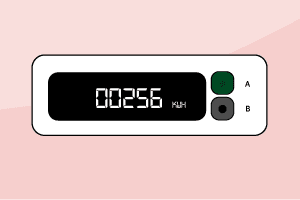
- Look at the screen – you don’t need to press any buttons
- Write down the number next to ‘KWH’ from left to right
- Ignore any zeroes at the beginning and any numbers after the decimal point if there is one
If your meter has 2 yellow square buttons to the left of the screen
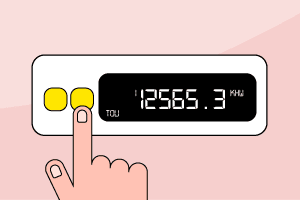
If you pay a single rate
- Press the right-hand yellow button
- Press the right-hand yellow button again until you see TOU, 1 and numbers followed by KWH
- Write down the numbers from left to right
- Ignore any zeroes at the beginning and any numbers after a decimal point if there is one
If you pay 2 rates
- Press the right-hand yellow button
- Press the right-hand yellow button again until you see TOU, 1 and numbers followed by KWH
- Write down the numbers from left to right
- Press the right-hand yellow button again and you’ll see TOU, 2 and numbers followed by KWH
- Write down the numbers from left to right
- Ignore any zeroes at the beginning and any numbers after a decimal point if there is one
If you’re not sure which is the day rate or the night rate, check the numbers in the morning and check again later that day. The number that’s changed will be your day or ‘peak’ rate.
If your meter has 1 blue button and 1 orange button to the right of the screen
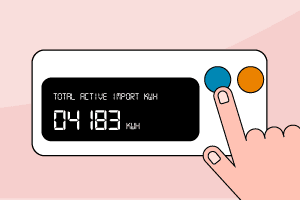
If you pay a single rate
- Press the blue button labelled ‘A’ to turn on the display light
- Press the blue button again until you see ‘Total active import kWh’
- Write down the numbers from left to right
- Ignore any zeroes at the beginning and any numbers after a decimal point if there is one
If you pay 2 rates
- Press the blue button labelled ‘A’ to turn on the display light
- Press the blue button again until you see ‘TOU Rate 1’
- Write down the numbers from left to right
- Press the blue button once more to see ‘TOU Rate 2’
- Write down the numbers from left to right
- Ignore any zeroes at the beginning and any numbers after a decimal point if there is one
If you’re not sure which is the day rate or the night rate, check the numbers in the morning and check again later that day. The number that’s changed will be your day or ‘peak’ rate.
Can’t find your meter?
Firstly you should check that your meter says “KMH” – this shows you’re looking at the right meter. If your meter says “M3” then you’re looking at your gas meter.
If you’re not sure that you have a smart meter you can take a look here to check if you have a standard electricity meter instead.
Get peace of mind with HomeServe
Obviously, smart meters are just one element when it comes to electrics in the home and there’s much more to making sure your home runs smoothly.
That’s why we offer electrical insurance and breakdown cover. Covering your home with an electrical policy not only gives you peace of mind that help is at hand in the event of a problem, but helps you avoid costly repair bills should something go wrong.


